

Every vector map export from MapVG contains two SVG files, packaged in a ZIP folder: one labelled "flat", one labelled "layered". Both show the identical map, but they organise it in fundamentally different ways – and choosing the right one depends on your use case.
In this article we’ll explain what each file is for. We’ll demonstrate the difference with an example that should help you decide whether to use the flat or layered SVG file when vectorising maps with MapVG.
Why there are two files
A map is a map, right? Well, technically that’s true. But when it comes to designing, styling, and editing a vector map in Illustrator (or similar vector editing software), there’s a question you need to answer for yourself first: What is more important – full accuracy or ease of editing?
On one hand, you want your map to match the real world exactly: every road, building, and park represented exactly as it is in reality. On the other hand, you want your vector file to be neatly organised for efficient editing.
To demonstrate the difference between the flat and layered SVG outputs, here's an example where this difference matters.
Example
Take a look at the real-world example image below: There’s a bridge crossing over a major road – this is a residential, “secondary” road sitting above a motorway.
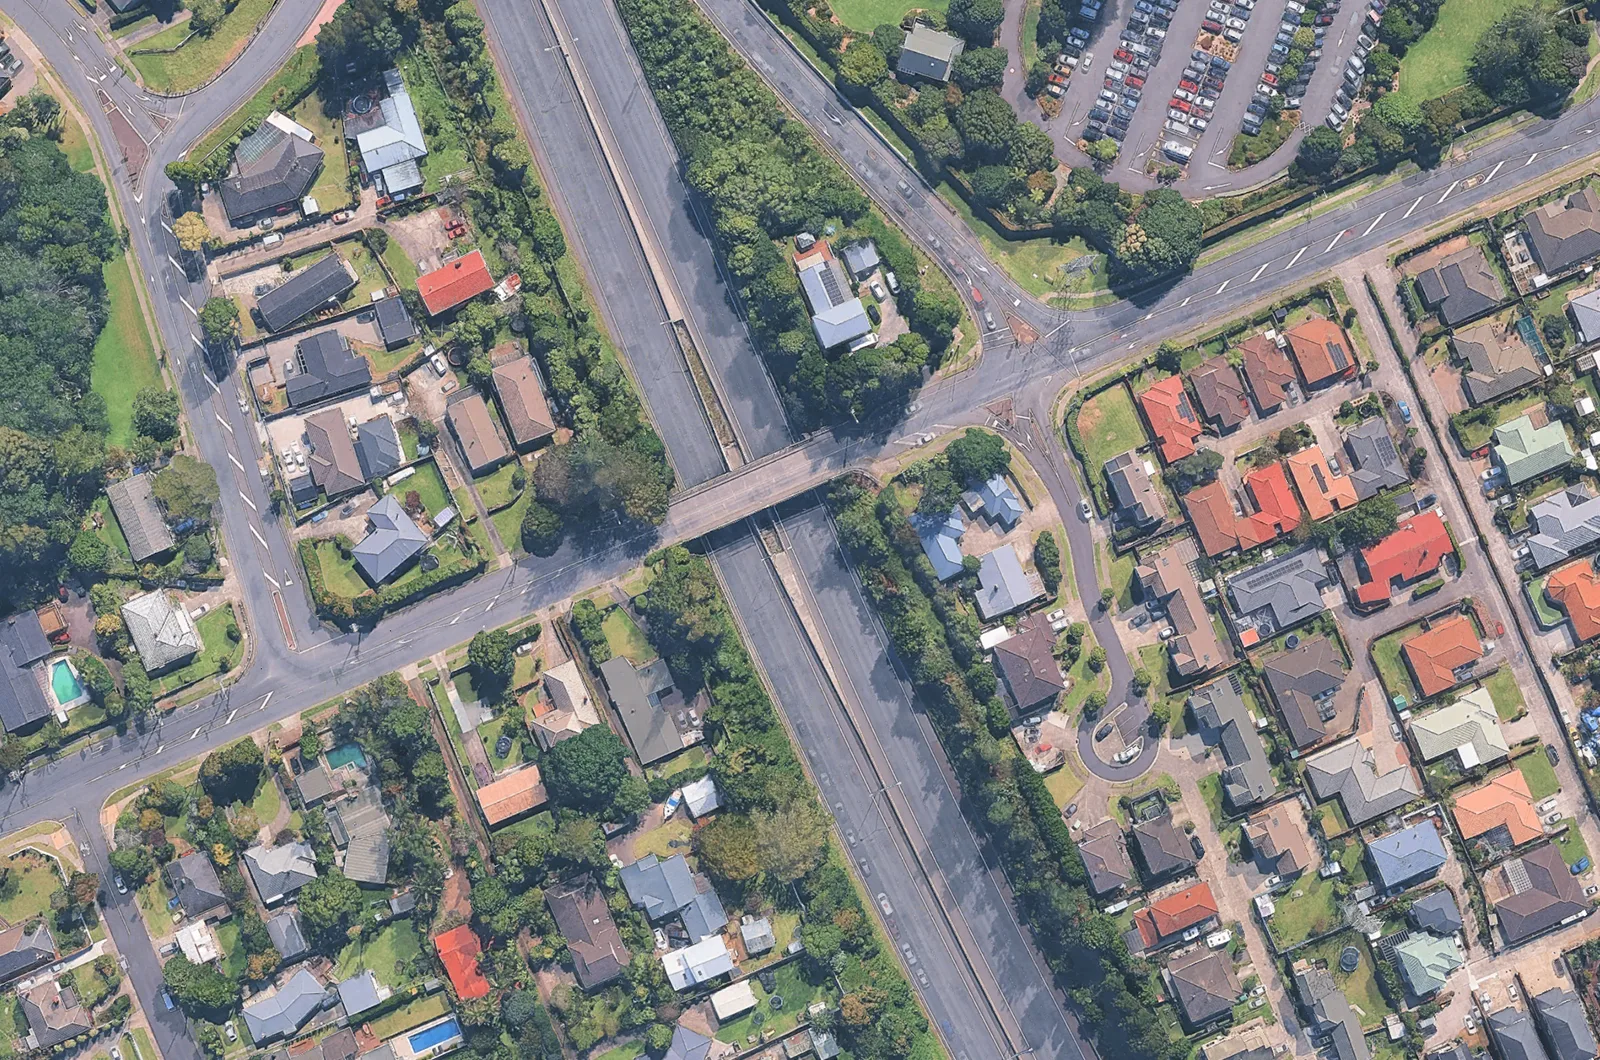
When we export this area as a vector map in MapVG. We’ll receive a ZIP folder with two SVG files: One labelled “flat”, and one labelled “layered”.
The flat SVG: true to the real world
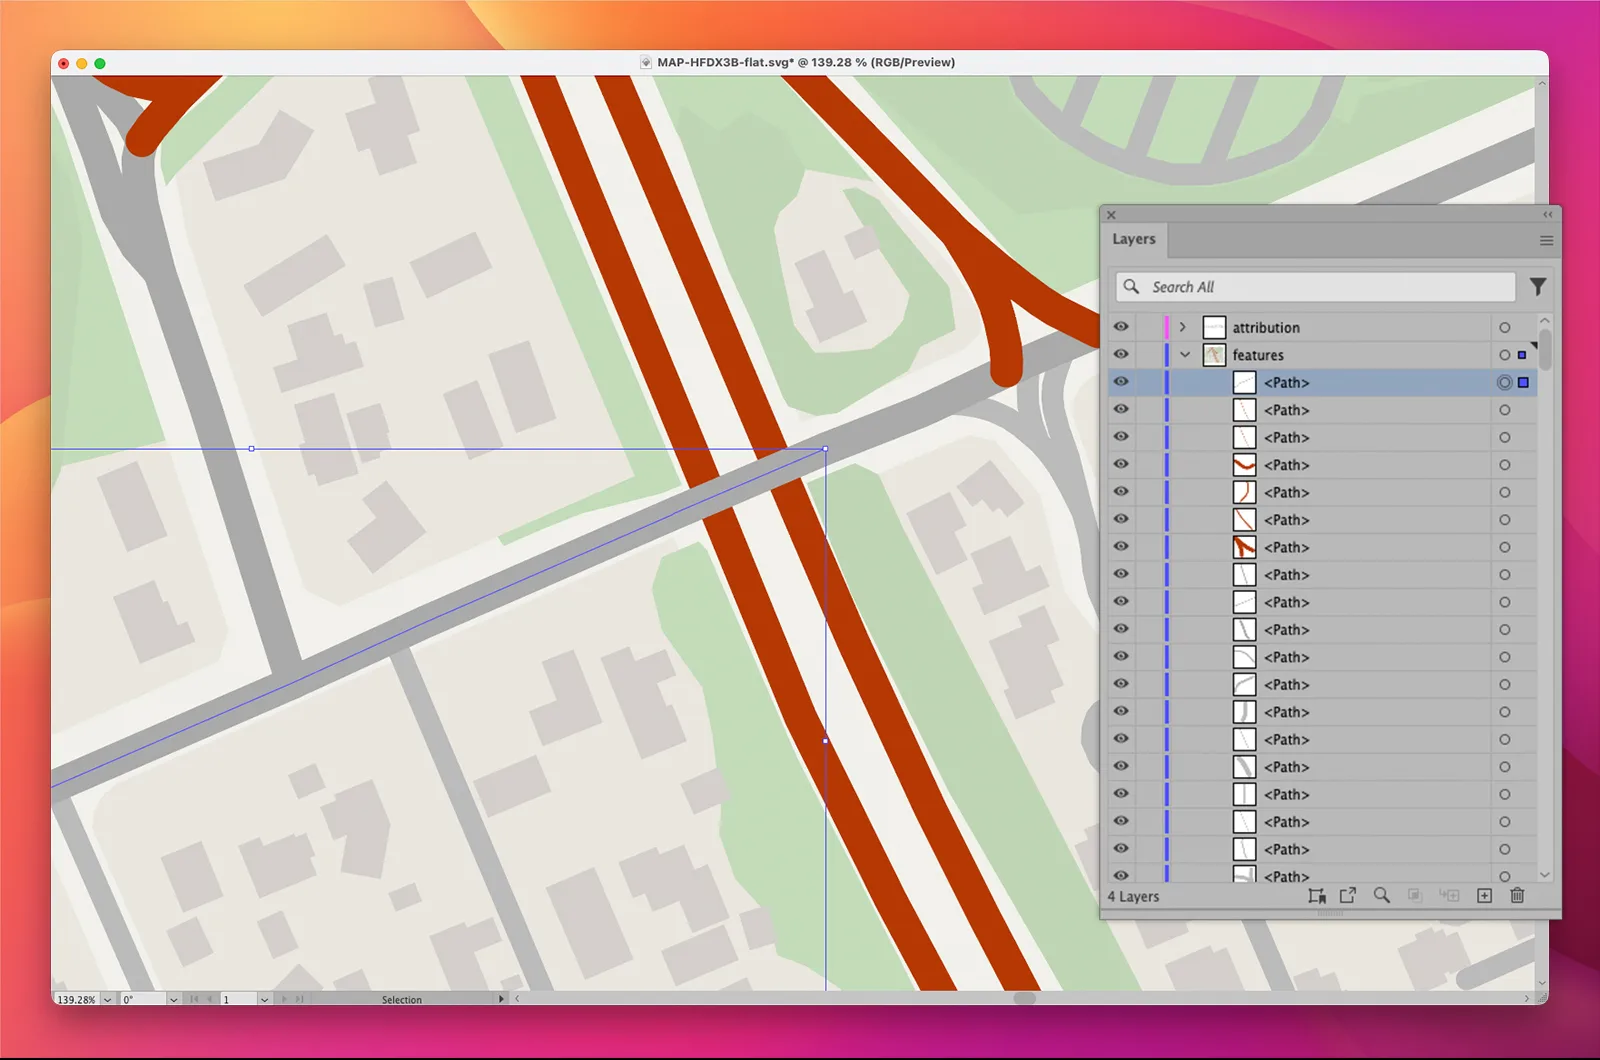
The flat SVG contains all map elements on a single layer, arranged in real-world stacking order – true to the physical altitude differences of the mapped area.
This applies to bridges, tunnels, subway lines, and any map feature that sits above or beneath another element. The result looks exactly right at every intersection, overpass and tunnel.
Example
The image below shows our secondary street bridge (grey) crossing above the motorway (red), exactly as it does in the real world. But notice the Layers panel: Elements of the same type are spread through the file rather than grouped together, because that would change the stacking order.
Benefits
Elements are stacked in real-world stacking order.
Your map matches the physical altitude differences of the mapped area.
Trade-offs
Because stacking order takes priority, elements aren’t grouped by layers and sublayers.
Lack of layers means it’s harder to select the same type of elements (e.g. select all motorways) at the same time for editing.
When to use the flat SVG
Use the flat SVG when geographic accuracy matters more than editorial control – wayfinding and navigation maps, or any output where an overpass rendering incorrectly would be a real error.
The layered SVG: built for editing
The layered SVG groups all map elements into named, organised layers and sublayers: all motorways on one layer, all lakes on another.
In editing software (such as Illustrator, Inkscape or Figma), these arrive as proper layers and sublayers in the Layers panel – select one, and every element of that type is selected with it.
Example
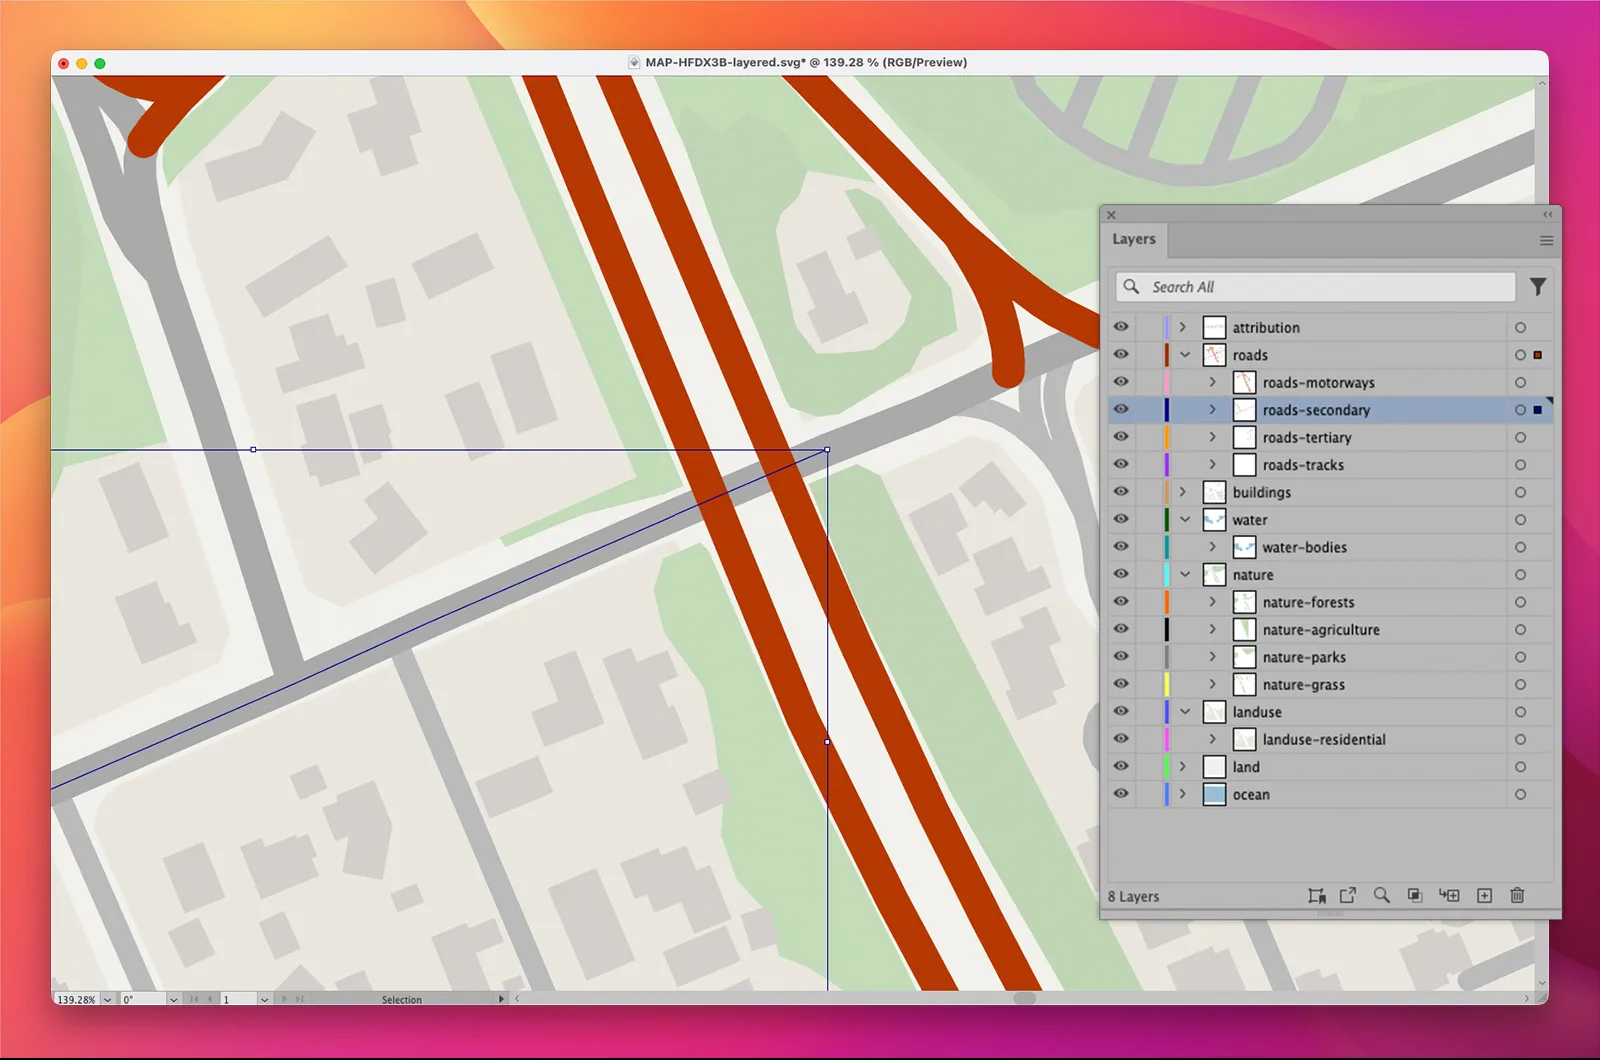
The image below shows our secondary street (grey) crossing below the motorway (red).
This is because roads are now grouped in sublayers, and roads-motorway is stacked above roads-secondary. This makes it much easier to select all motorways at the same time for fast bulk-editing, but it has also changed the stacking order of the roads.
Benefits
A clean, organised Layers panel that makes the file easy to navigate.
Easy one-click restyling: recolour every road type at once, change stroke thickness, or hide entire layers at once.
Trade-offs
- Your map may contain spots where the stacking contradicts reality.
When to use the layered SVG
Use the layered SVG when the map is a design element – custom city map posters, prints, branding, laser cutting – and editability and visual clarity matter more than altitude precision.
Which file for which job
The use cases below are recommendations, not rules – and since every export contains both files, it doesn’t cost you any extra to try both. If in doubt, open each one and see which suits your workflow.
Project | Recommended SVG |
|---|---|
A map poster or print | Layered |
Brand or editorial artwork | Layered |
A laser cutting or engraving template | Layered |
A wayfinding or navigation map | Flat |
A reference map where overpasses must render correctly | Flat |
When it really matters
It’s worth keeping in mind that the choice only really matters if your map contains places where altitude comes into play – bridges, tunnels, overpasses, underground rail.
If your area has none of these, the two files essentially render identically, and the layered one is simply the better-organised version of the same map. And if there are only a handful of such spots, the practical middle ground is to use the layered file and manually restack those few elements – a minute of work in exchange for keeping the organised layers.
See the difference yourself
The quickest way to understand the two formats is to open them side by side. Export a free vector map of any area up to 1 km² – no credits needed.
If you specifically want to compare the flat and layered files, be sure to select an area that features bridges, tunnels, subways or monorails. Some great examples of busy intersections include the “Spaghetti Junction” in Birmingham (UK), the Judge Harry Pregerson Interchange in Los Angeles (USA), the “Huangjuewan Junction” in Chongqing (China), and the layered rail network and elevated expressways in Tokyo (Japan).